Molten Lava Cake

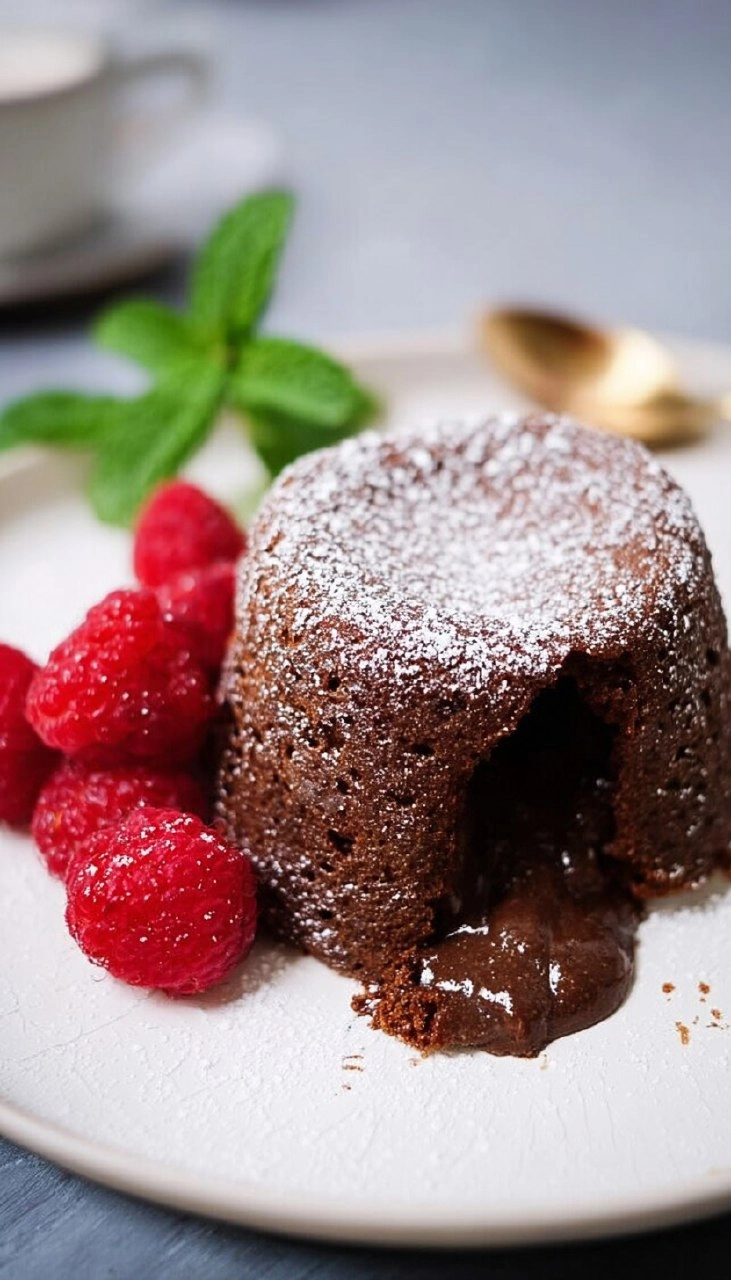
There’s nothing quite like the decadent experience of biting into a perfectly made Molten Lava Cake. As soon as you break the surface, a river of warm chocolate flows out, creating a heavenly sensation that captivates your senses. This delightful dessert features its signature rich chocolate flavor, complemented by a delicate balance of sweetness and a hint of vanilla. You’ll instantly find yourself craving a slice of this luscious treat to end your meal on a high note!

I still remember the first time I attempted to make molten lava cake. I was excited and slightly nervous, hoping to recreate that dining-out experience right in my kitchen. The moment the cake came out of the oven and the molten center oozed out was pure magic! Rich, indulgent, and surprisingly simple to prepare, this recipe is budget-friendly and sure to impress friends and family, making it perfect for dinner parties, special occasions, or even a cozy night in. Let’s dive into how to make this dreamy dessert that will leave everyone begging for seconds!
Table of Contents
Why You’ll Love This Recipe
- Simple & Quick: Ready in just about 30 minutes, it’s perfect for last-minute cravings!
- Irresistible Flavor: The combination of dark chocolate and buttery goodness creates a melt-in-your-mouth texture that’s impossible to resist.
- Eye-Catching Appeal: Serve these in cute ramekins for an elegant presentation; they look as amazing as they taste!
- Flexible Serving: Great for any occasion—romantic dinners, family get-togethers, or just because!
- Diet-Friendly Options: You can easily make this recipe gluten-free by using a gluten-free flour substitute!
Ingredients You’ll Need
- 1/2 cup butter: This provides a rich base for the cake. Use unsalted butter for better control over the sweetness.
- 4 oz semi-sweet chocolate, chopped: A must for that dreamy molten filling. If you prefer darker flavors, you can substitute with bittersweet chocolate.
- 1 cup powdered sugar: This sweetens the batter while keeping it light and fluffy. For a less sweet cake, you could reduce it slightly.
- 2 large eggs: These are essential for binding the ingredients and helping the cake rise perfectly.
- 2 egg yolks: They add richness to the cake, enhancing the chocolate flavor.
- 1 tsp vanilla extract: A dash of vanilla rounds out the flavor beautifully.
- 1/4 cup all-purpose flour: This adds structure to the cake while still ensuring a soft center. Consider using almond flour for a gluten-free version.
- Pinch of salt: Enhances the flavors of the chocolate and balances the sweetness.
- Fresh raspberries and additional powdered sugar for serving (optional): A fresh pop against the rich chocolate adds a delightful finish to the dessert.
How to Make Molten Lava Cake
- Preheat the Oven: Begin by preheating your oven to 425°F (220°C). Grab four small ramekins and grease them well, dusting lightly with flour or cocoa powder to prevent sticking.
- Melt Butter and Chocolate: Combine 1/2 cup of unsalted butter and 4 oz of chopped semi-sweet chocolate in a microwave-safe bowl or over a double boiler. Heat until melted, stirring until everything is smooth and glossy.
- Incorporate Sugar: Whisk in 1 cup of powdered sugar until fully combined. It should look slightly thick and sticky at this point.
- Add Eggs: Mix in 2 large eggs and 2 egg yolks, whisking until the batter is smooth. Incorporate 1 tsp vanilla extract next to enhance that rich chocolate flavor.
- Fold in Dry Ingredients: Gently fold in 1/4 cup of all-purpose flour and a pinch of salt using a spatula, making sure just to combine everything without over-mixing.
- Fill Ramekins: Divide the batter evenly among the prepared ramekins, filling each about 3/4 full. This way, the cake has room to puff up.
- Bake: Place the ramekins in the preheated oven and bake for 10-12 minutes. Look for the edges to set while the centers remain soft and slightly jiggly—this is what gives the cake its molten core!
- Cool and Serve: After baking, let them cool for just 1 minute. Carefully invert each ramekin onto a plate, allowing the cake to release onto the plate. Dust with powdered sugar and garnish with fresh raspberries for that finishing touch. Enjoy immediately for the best molten experience!
Storing & Reheating
To store your leftover molten lava cakes, let them cool completely and keep them at room temperature for up to 2 hours. If you want to save them longer, they can be refrigerated in an airtight container for up to 3 days. For longer storage, freeze them for up to 3 months. When you’re ready to enjoy them again, simply reheat in the oven at 350°F (175°C) for about 10 minutes; just be mindful that the molten texture may change a bit, so serve them warm right out of the oven for the best experience!
Chef’s Helpful Tips
- Avoid overbaking! A minute too long can turn this indulgent dessert into a simple chocolate cake instead of that luscious molten center we crave.
- Ensure your eggs are at room temperature, which helps them incorporate smoothly into the batter, creating a fluffy texture.
- To enhance flavor, consider adding a splash of espresso powder to the batter; it will intensify the chocolate taste without making the cake taste like coffee.
- If you want to impress, try serving the cakes with a scoop of vanilla ice cream; the contrast of hot and cold makes for an unforgettable dessert!
- You can also prepare the batter in advance and refrigerate it for a few hours before baking, making it a perfect make-ahead option for entertaining.
There’s just something exceptional about homemade molten lava cake, and it’s the perfect way to end any meal. As you spoon through the delicate crust into the gooey chocolate center, you’ll find that it’s simply irresistible. So gather your ingredients, follow these straightforward steps, and enjoy this delightful dessert that’s likely to become a family favorite.
Recipe FAQs
Can I use other types of chocolate?
Can I make this recipe ahead of time?
What should I do if my cakes don’t have a molten center?
How do I know when the cakes are done?
⭐ If you make my Molten Lava Cake recipe, Awesome! I would love to hear from you. Please give it a star rating and review below! 👇
Molten Lava Cake
This Molten Lava Cake brings together rich chocolate, butter, and a hint of vanilla into a warm, gooey dessert that’s easy to make at home. Perfect for impressing guests or a special treat, it combines simple ingredients with incredible taste.
- Prep Time 10 minutes
- Cook Time 22 minutes
- Yield 4 servings 1x
Ingredients
- 1/2 cup butter
- 4 oz semi-sweet chocolate chopped
- 1 cup powdered sugar
- 2 large eggs
- 2 egg yolks
- 1 tsp vanilla extract
- 1/4 cup all-purpose flour
- pinch of salt
- fresh raspberries and additional powdered sugar for serving, optional
Instructions
- Preheat your oven to 425°F. Grease 4 small ramekins and dust them lightly with flour or cocoa powder.
- Melt the butter and chopped chocolate together in a microwave-safe bowl or using a double boiler, stirring until the mixture is smooth and glossy.
- Whisk in the powdered sugar until fully combined. Then, add in the eggs and egg yolks, whisking until the mixture is cohesive. Stir in the vanilla extract.
- Gently fold in the flour and salt until just blended, taking care not to over-mix.
- Evenly divide the batter among the prepared ramekins. Bake for 10–12 minutes, ensuring the edges are set but the centers remain soft and molten.
- Allow the cakes to cool for 1 minute, then carefully invert each ramekin onto a plate. Dust with powdered sugar and garnish with fresh raspberries. Serve right away.
Notes
Do not overbake the cakes; the center should remain molten for that perfect lava effect.
Serve immediately for the best experience, as the molten center is most enjoyable right out of the oven.
You can customize your toppings with whipped cream or ice cream for an extra treat.
Nutrition
- Serving Size: 1 cake
- Calories: 350
- Sugar: 25g
- Sodium: 200mg
- Fat: 22g
- Saturated Fat: 13g
- Unsaturated Fat: 8g
- Trans Fat: 0g
- Carbohydrates: 36g
- Fiber: 1g
- Protein: 5g
- Cholesterol: 120mg
Nutritional information is an estimate. The nutritional values for your final dish may vary based on measuring differences and products used.